
Editing Magic (& Struggles)
- Natalia Muñiz Blasco
- Mar 29, 2022
- 11 min read

Updated: Apr 2, 2022

Hi everyone!
I am now past the editing process of my music video, these last weeks after the filming I have been gradually editing each verse and chorus which has helped me to manage my workflow and have enough time to dedicate to each shot and make sure it was to my liking.
In this post, I want to run through some of the struggles I have encountered, as well as some of the video tutorials of Premiere Pro I have watched to get my ideas and come up with new strategies to overcome struggles.
Hope you enjoy this post!
xx Natalia
Continuity Editing (including match on action):
The editing needs to make sense to be able to conduct appropriate storytelling that makes sense without looking patchy or too amateur. As I have made a narrative music video, the continuity editing was even more important- here are some examples of how I have aimed to achieve it:
Chorus 2:
Cutting on action, joining various shots with the same action either moving from CU to MCU or cutting between two shots where my actress was walking.
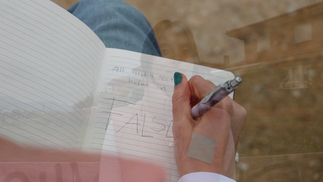
Using a cross dissolve when going from the CU of the notebook to the beginning of the transition, as I wanted to convey the lapse of time, or to at least make the distinction between the normal cuts (following a course of action) and a shot that was purely there for the transition, for the sake of coherence.
In the Climax Scene, the cross-fade between the collage shot and the CU of the girl forcing her smile has a different effect: creating a slower pace and a feeling of the uncanny that matches the mood and narrative.
And in the ending scene outdoors, I used a film cut that looked more cinematic than the usual cross-dissolve, this time for a stylistic purpose, as well as to convey the elapse of time and the transition from an indoor to an outdoor location.


Chorus 2 Instrumental: Making sure the rubbish bin shots were sharp and quick, and cutting just as the paper was being thrown inside, not waiting for it- cutting mid-movement.
Final Chorus: Cutting in the middle of some shots to add some speed- posits hanging and the hint back scene
More cutting on action, especially from the ECU of the girl tearing off the post-its, the CU of the post-it bits falling to the floor and back to that MLS in the action, to add a sense of continuity and dynamic feel.
I also used a graphic match cut between the 360º shot and the next CU of the girl in the "sightseer" persona breaking the post-it too, as I told my actress to look to the right in both scenes to join the shots with a graphic match cut. Moreover, the following shot cuts back to the broken post-its as the girl breaks her "sightseer" post-it which joins both shots implicitly as a cut on action.


Cuts to the Music:
Even though my music video follows a narrative, it is still a music video and as such, it must follow certain key conventions, such as cutting to the beat of the music. I also think this is the best option when playing any background music in film as the audience implicitly expects cuts to match the rhythm of the music and it makes the footage much more coherent.
All of my shots are cut to the music, from the slower pace of the first verse and climax to the fast cross-cutting on the instrumental part of the second chorus.
The cross-cutting scene was an important scene to cut to the music as it has a faster pace and helps with the storytelling.
Cutting to the beat was also an important base to construct the more complex edited shots such as collages, "invisible collages", etc., as some times I was trying to create a faster pace on shots that were too long, and hence cutting to the beat was crucial.
Other important shots where I cut to the music were the static shots where I used the tripod- the bin shot where it gets gradually fuller (to the beat), the post-it that breaks by itself (to the beat) and the "false confidence" list that has gradually more holes (also to the beat). This is a quick and easy way to convey a message that looks sharp and effective with a static shot that stays dynamic.
Sometimes, I had to play with the speed of my clips a little bit to cut exactly to the beat, which was almost never a problem (see below).


Zoom In for Dynamism:
Sometimes, a shot was too static and ruined the nice pace of the previous sequence, other times, there simply needed to be more emphasis on some details:
A small zoom in on the shot of the notebook in the first verse was needed to keep up the dynamic feel of the sequence. (I used the 'crop' tool using key frames to establish the amount of zoom, the pace and the time for it to occur; this works nicely for small zooms, as I saw in an editing video a long time ago, but should not be used a the norm for a zoom).
Another small zoom in on the first shot of the false confidence list in the last chorus, again to add extra movement before the next very quick three shots that were dynamic due to their short length.
On the final chorus, the post-its saying "false confidence" needed to have more emphasis, so I cut to the beat 3 shots, each one zooming in more to add emphasis on the change in the post-its which is extremely meaningful for the narrative.


Collage Shots:
Collage shots became more of a problem-solving feature than a stylistic plan, as you might have realised they were not present in my storyboards often. However, the invisible collage effect was indeed performed according to plan, although I learned how to do it better for next time.
On the first chorus, the collage scene replaces a shot that I thought was too long. I used the same technique on the final chorus as the girl rips the piece of paper which I thought also made sense given she was slicing the paper and the scene was breaking into smaller pieces of the same image too.
On the second verse, the collage shot is different, as it shows different parts of the frame. This came as a problem solving issue (more on that later) and hence I had to use the crop effect to zoom in on different parts of one same shot and try to create diversity out of an extremely boring and dodgy shot.
Scene 5 was difficult to understand (more on that later) so my mum, having had trouble understanding it at first, gave me the idea to use split screens for the two shots of the girl looking at herself in the mirror, instead of just two separate close-ups; for this shot, the collage had to be explicit and hence I simply cropped and repositioned both shots leaving a black space in the middle.


The implicit/invisible collage on the instrumental part of chorus 2 was made by simply filming one same frame, dividing it in two and filming my actress with different outfits on the two main parts of that frame, so that then I could use the crop effect to have those two clips at the same time re-creating one same shot. The issue with this was that I did not use a tripod and hence I had to use the "lumetri color" effect to fix the exposure that doesn't look 100% perfect, especially on the first two co-existing shots.
On the invisible collage of scene 5, I also made the mistake of not filming with a tripod; this time, the stability was more of an issue as I had slightly altered the speed and hence could not use the warp stabiliser effect to make the footage stay still.


Colour Grading:
Thanks to the amazing camera lent to me by my uncle, and to the lights I had rented, and the choice of colourful props, my footage looked very good in terms of colour when I came to edit it, unlike last year where I had to include a highly saturated "lumetri color" effect to give my film opening a romance feel. However, as always, colour grading needed to be done on some clips to make sure that the colour-palette was consistent throughout.
On the 4 shots before the second chorus saying "surrender yourself", I colour-graded them slightly specifically for a continuity effect. As I had not filmed them at the exact same time, and the sky became more cloudy, which resulted in me making my key light warmer to keep the sunlight effect consistent, I had to edit down the temperature slightly in a couple of those 4 shots so they looked coherent.
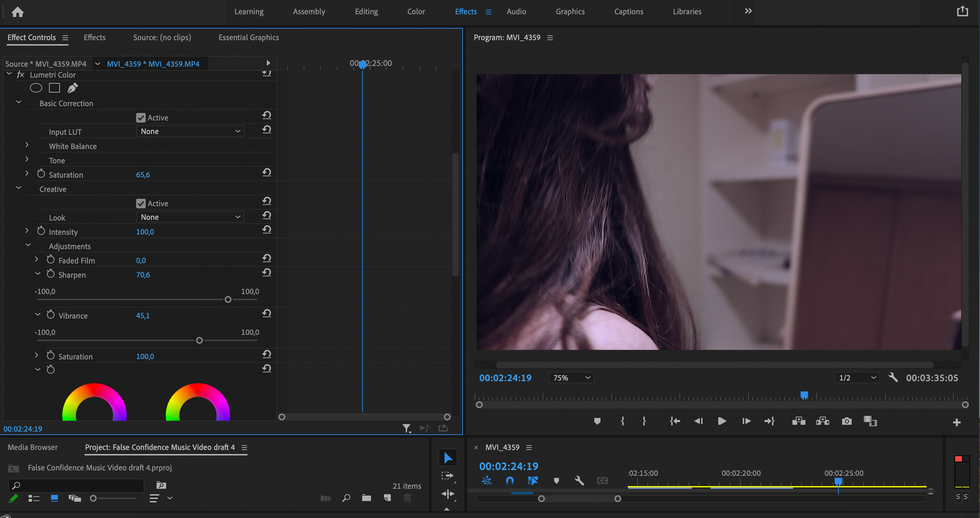
In the climax in the bathroom, I made sure to have not only the pink ring light for a nice hue (that cannot be achieved through editing at all), but a source of light, having learnt from last year that my ring light was no-where near powerful enough to light that scene. However, some more saturation and exposure needed to be added so the strength of colour and brightness stayed consistent with the rest of the music video.
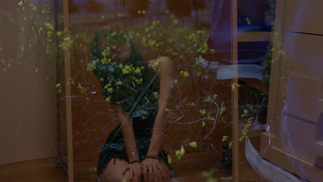
On the final chorus, there is a distinction between the world on one side of the mirror and the other, symbolising the girl's outer and inner selves. Here, I wanted to make that distinction extra clear by using colour-grading with purple and blue tones (colder) and hence convey the dichotomy between the girl's inner and outer selves as they come into conflict before reaching a resolution. I also used the "lumetri color" effect, playing with the more advanced settings of colour curves, especially the blue colour to add that purple hue, and the saturation.


Transitions:
My biggest concern was that having a music video where the focal point was the same room would become boring, especially by the last chorus. That is why I used so many shots, invisible collages, cross-cutting, etc. However, I thought that having a mirror was very cool to create meaning about the dichotomy between the girl's inner and outer selves coming into conflict. I also used transitions to level-up my footage throughout:
Colour transition: one of the tricks from my transition filming tutorials was using the same colour to transition from one shot to another, as I did from the first chorus to the second verse; here I had to speed up fragments of both clips to make it seem imperceptible and as quick as it needed to be, so I split those two shots and only edited the speed on the part that was to become the transition on both shots.
I also used match cuts as more elaborate transitions in the instrumental of the first chorus, cutting in the middle of a turn, and editing ever-so-slightly the scale of the footage so that in both shots the actress was the same size on the frame to make the transition seem seamless.


(in the image below you can see they aren't exactly the same but the transition looks smooth as it is very fast and the girl is more or less the same size).


The transition on chorus 2 from the outdoor back into the indoor location was trickier, and I have mixed feelings about the speed as it feels slow for how fast those transitions usually are, but it matches the speed and lyrics of the music so I think it works nonetheless. In the editing process, I also used a black space of a couple of frames and a dip to and from black for both shots to make the transition even smoother.
(here I had not yet added the dip to black between the clips and the black frames but you can see the effect)
Of course, the mirror transitions were the most challenging ones, and it has to be said I did them quicker than I should have, as we ran out of time to film at the end of the day. However, I knew that I needed the motion blur for them to be smooth and in the editing process, I did my very best re-positioning the clips and cutting exactly in the motion-blur I managed to film between any two shots with this transition; so that both the size and the movement looked smooth and seamless. I also used the inverted filter in Premiere Pro to create the effect of going from one side to the other of the mirror, which was very simple to use- just drag and drop ;)
Now, I'm not a fan of very artificial preset transitions, but I needed the extra push on the final chorus when my actress finally breaks her post it in the "wake up wonder why", so I chose a preset transition from Premiere Pro that looked the least amateur like of them and significantly reduced the speed of the breaking of the post-it so it even matched the beat.


(look at the use of "horizontal flip" on the clip on the left and the fact that both frames have some motion blur).

Here is the spherical blur ^^
Fixing issues:
As always, I am not an expert DoP and hence several issues came up when filming; however, the biggest takeaway for me is having been able to fix them in the end!
Filming in front of a mirror was a bigger struggle than I honestly expected :), and when I was editing my final draft I realised the 360º shot of my actress throwing the post-it bits in the air had my foot and leg visible in the mirror (which is incredible given that by that point I could run through the video with my eyes closed, but when a friend looked at it, we both realised at the same time that it was there!). For this, I just increased the scale, but it was slightly tricky as the 360º movement meant that my actress was not always on the centre of the shot. This meant I had to add keyframes for the position throughout the movement, but they looked very at first. The solution was to add the position key frames but to avoid the re-positioning start until the 360º movement had started; this way, the re-positioning in the editing was hidden behind the actual camera movement, and the slow-motion made it even less perceptible.

Another issue I have not really been able to fully fix was not being able to film in 60fps. This means that slowing down footage of 25fps exceedingly will result in blocky movements (as when the girl breaks the post-it for the first time, which is ok then but not always). An example where this became a problem was the static shot of the post-it bits falling down, where I would have liked a very slow shot of them falling but ended up placing two consecutive shots with an imperceptible cross-dissolve in between to fill up the needed seconds without slowing the footage too much. That is also why the 360º movement was not as smooth either.

In the climax scene, I made a big continuity miscalculation even on the storyboards planning, and was saved by having filmed some extra footage (fortunately). The two shots where the girl is looking at herself in the mirror I had planned as CU with direct gaze to the camera; it was only when showing the scene to my mum and realising she couldn't understand it well that I figured out what was wrong. Fortunately I had some clips of my actress looking at the mirror, but I had to slow them down as they were a bit short for the time they had to cover, which led to my not being able to use the warp stabiliser effect when it would have been useful, and having an unplanned slow-motion shot in the collage there (even though it actually looks ok).
In that same scene, I also filmed with an angle that did not let a key shot be properly understood. Where the girl smiles to the mirror and the mirror image starts crying. However, I did not angle the camera well (probably more focused on not being seen in the huge mirror my bathroom has) and the message comes across but not as clearly, as the girl's face is not visible at all on the clip on the left.


Resources I Used for Editing:
Of course, none of this would have been possible without some research, so here are some videos that I used to get the ideas and methods for some techniques (e.g. collage and inverted collage).
This one gave me some ideas for what would later become my mirror video:
With these videos, I learned about the importance of motion blur:
These two videos helped me with the collage effects:
I had watched this video a long time ago, and got the idea of the inverted collage from there:
I hope you guys have liked this post, and learned some tips about editing, as well as understood the long and complex process that goes into editing.
Stay tuned to see the final result!


Comments