
Editing Text:
- Natalia Muñiz Blasco
- Mar 29, 2022
- 2 min read

Updated: Apr 2, 2022

Hi everyone!
Who would have thought that after writing the longest post on my blog about editing, that I would have anything more to say about the editing process? Well, here I am, with more details, this time about the titles and how I edited the text in my music video.
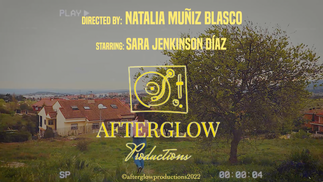
For me, having nice and aesthetic titles that conveyed the mood of the song as well as the general theme was essential, and hence I did my research on animating text and making it look nice.
Hope you like this post!
xx Natalia
Research on Text Animations (+ how I applied it):
Let's do things the other way round here, and start with the inspiration; here are some videos that I watched to get some ideas of how to work with text, specially with masking text.
#1:
This video helped me understand how to mask the background behind the text, which I used in the first title sequence:
I used a yellow colour matte which I think matched the mood of the song perfectly, and masked the text with the video. The issue was that I had to import the video as a separate file, and hence had to time the transition to the next clip perfectly, which took several tries.

I also added keyframes to increase the scale, changing the anchor point to inside one of the letters so the animation made the video come through the letters.

#2:
This video helped me create a cool text animation for my text when introducing my actress. I thought it looked great and also wanted to experiment with it. I had a lot of fun and satisfaction when I finally did it.
I created a mask around the text which I adjusted using the mask patch and key frames so they matched the motion of the line.

I also adjusted the line: the width when it appeared and the key frames with the horizontal position. I also edited the key frames so that instead of "linear" they were in the "ease out" effect which made the motion smoother. I created the line using a colour matte and then adjusted its width and length.

#3:
As my music video is rather narrative and has a main message, I thought it would be cool to add a quote at the end, and hence decided to type it with an effect in Premiere Pro. In the end, I also used this to write "DAY 1" in each chorus and make the narrative clearer.
I included a typewriter sound as the text was being written (which you can see on the little green sound on the A2 panel)

Adding keyframes was a tedious process but made easier by the possibility to move each frame with the arrows. I had to adjust the speed a couple of times, but the ending was definitely worth it.

Ending Credits:
After the quote, I wanted to include the credits in an original way, and I remembered having a nice shot outdoors that I filmed along with the second chorus, and a VHS preset I had already created. Going with the theme, I used the same yellow colour and fonts, and decided to include a "special thanks to" frame for the people and companies that helped me by me borrowing/renting the equipment.


Comments